How to: Automate Word 2010 to convert a document to PDF using VC++

Many a times, people need to convert a Word document to PDF. There are several ways to achieve that. Here, I am discussing a way by automating Word 2010 to convert the document to PDF using VC++. To demonstrate this, I will use Visual Studio 2010, MFC Dialog based application and Word 2010.

We will start with creating a MFC Dialog based application in Visual Studio 2010. Then we will discuss about how to automate Word. In this sample, I will use #import directive to reference the Word library. There are other ways to do automation using VC++. For more information, go through the following links.

Office Automation Using Visual C++
http://support.microsoft.com/kb/196776

HOW TO: Handle Word Events by Using Visual C++ .NET and MFC
http://support.microsoft.com/kb/309294

How to catch Word application events by using Visual C++
http://support.microsoft.com/kb/183599

  1. Create a new Dialog based MFC application in Microsoft Visual Studio 2010 and give the name as ConvertDocumentToPDF
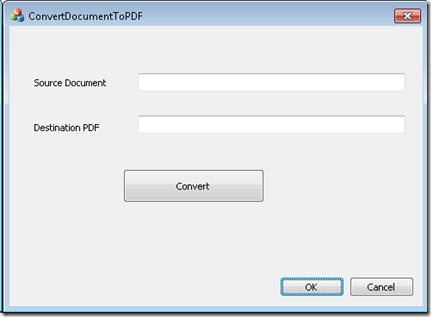
  2. Design the dialog as given below.image
  3. Change the ID of the controls as given below:
    IDC_EDIT1 – IDC_SourceDocument
    IDC_EDIT2 – IDC_DestinationPDF
    IDC_BUTTON1 – IDC_BtnConvert
  4. Open Class Wizard and add member variables for IDC_SourceDocument and IDC_DestinationPDF as shown below:
    image
  5. Open the ConverDocumentToPDFDlg.cpp and add the following code above Class CAboutDlg declaration

    #import “C:\Program Files (x86)\Common Files\microsoft shared\Office14\mso.dll”
    #import “C:\Program Files (x86)\Common Files\microsoft shared\VBA\VBA6\VBE6EXT.olb”
    #import “C:\Program Files (X86)\Microsoft Office\Office14\msword.olb” named_guids, rename(“RGB”, “MsoRGB”), rename(“ExitWindows”, “_ExitWindows”), rename(“FindText”, “_FindText”)

    using namespace Word;

  6. Add the button click event for the Convert button.
  7. Copy the following code to the button click event handler.

    CoInitialize(NULL);

    // Create the Word Application instance
    Word::_ApplicationPtr wordApp;
    HRESULT hr = wordApp.CreateInstance(__uuidof(Word::Application));

    if(FAILED(hr))
    {
    AfxMessageBox(L”Couldn’t create Word instance”);
    return;
    }

    // Make the Word instance visible.
    // This can be omitted, if you want Word to run in background
    wordApp->Visible = VARIANT_TRUE;

    // Get the Documents object
    Word::DocumentsPtr wordDocuments = wordApp->Documents;

    // Update the member variable associated with the controls
    //
    http://msdn.microsoft.com/en-us/library/t9fb9hww(v=VS.80).aspx
    UpdateData();

    // Convert CString to _bstr_t
    _bstr_t sourceFilePath(m_SourceDocument);

    // Open the SourceFile
    Word::_DocumentPtr wordDocument = wordDocuments->Open(&_variant_t(sourceFilePath));

    if(wordDocument == NULL)
    {
    AfxMessageBox(L”Couldn’t open the document”);
    return;
    }

    // File format should be VARIANT with vt as VT_I4
    VARIANT fileFormat;
    fileFormat.vt = VT_I4;
    fileFormat.intVal = Word::WdSaveFormat::wdFormatPDF;

    // Save the file as PDF
    _bstr_t destinationFilePath(m_DestinationPDF);
    wordDocument->SaveAs2(&_variant_t(destinationFilePath), &fileFormat);

    // Close the document and Quit Word
    wordDocument->Close();
    wordApp->Quit();

    CoUninitialize();

  8. Build and run the application.

    One thing to be noted is the way of specifying the FileFormat argument in SaveAs2 method. SaveAs2 method accepts VARIANT * as the argument. Hence the wdFormatPDF enumeration should be wrapped inside a VARIANT as given below:

// File format should be VARIANT with vt as VT_I4
VARIANT fileFormat;
fileFormat.vt = VT_I4;
fileFormat.intVal = Word::WdSaveFormat::wdFormatPDF;

Let me know if there is any question.
How to call a .NET method in PowerShell 2.0?

As you know, PowerShell is built on top of .NET. One can use the features of .NET Framework and can use any assemblies in .NET. This includes the built-in assembly as well as the user created one. In this post, I would like to describe how to call a static method defined in an assembly.

I would like to take the System.Windows.Forms.MessageBox.Show() method as an example. We use the :: operator to access the static methods in PowerShell. To begin with we use the following code in PowerShell to display a message box which says ‘”Hello World”

PS C:\> [System.Windows.Forms.MessageBox]::Show(“Hello World”)

However, this will not work as expected. When you execute the above command in PowerShell, it will give the following error

Unable to find type [System.Windows.Forms.MessageBox]: make sure that the assembly containing this type is loaded.
At line:1 char:34
+ [System.Windows.Forms.MessageBox] <<<< ::Show("Hello World")
    + CategoryInfo          : InvalidOperation: (System.Windows.Forms.MessageBox:String) [], RuntimeException
    + FullyQualifiedErrorId : TypeNotFound

Don’t panic. This is because PowerShell did not recognize the MessageBox.Show() method defined in the System.Windows.Forms namespace. To make this work, we need to load the System.Windows.Forms assembly like we will do in any .NET application. The following command will load the assembly.

PS C:\> Add-Type –AssemblyName System.Windows.Forms

Once you load the assembly through Add-Type cmdlet, you can use the command to display a message box.

PS C:\> [System.Windows.Forms.MessageBox]::Show(“Hello World”)

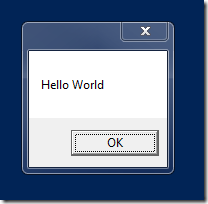
This will display a message box with an OK button and “Hello World” as the text.

image

This is not over yet. Now how to use the enumerations like MessageBoxButtons and MessageBoxIcons in a message box. Something like:

System.Windows.Forms.MessageBox.Show(“Hello World”, “Simply Hello World”, MessageBoxButtons.OkCancel, MessageBoxIcon.Information)

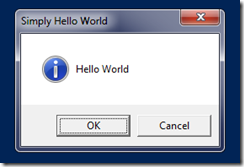
We use the same operator (::) to access the enumerations as well. The sample command is given below:

PS C:\> [System.Windows.Forms.MessageBox]::Show(“Hello World”, “Simply Hello World”, [System.Windows.Forms.MessageBoxButtons]::OkCancel, [System.Windows.Forms.MessageBoxIcon]::Information)

Now that looks better, doesn’t it?

image

I know, the next question will be “how will you handle the result from MessageBox?”. It is simple, store the result in a variable using the following command

PS C:\> $result = [System.Windows.Forms.MessageBox]::Show(“Hello World”, “Simply Hello World”, [System.Windows.Forms.MessageBoxButtons]::OkCancel, [System.Windows.Forms.MessageBoxIcon]::Information)

Once we get the result, check the value and perform the action as given in the sample below:

if($result -eq [System.Windows.Forms.DialogResult]::OK) {Write-Host "You clicked OK button"}

I hope this helps you. Let me know if you have any feedback.

How to create a Word document from a template (.dotx) using Open XML SDK

One of the needs to use Open XML SDK is to create a document on server side. Creating a Word document from scratch using Open XML SDK is very tedious especially when it contains styles and themes. It is a good idea to create a document manually and then create a copy from this document and modify its content. A sample code that does the same is given below:

System.IO.File.Copy(sourceFile, destinationFile);
using (WordProcessingDocument document = WordProcessingDocument.Open(destinationFile, true))
{
   // Code to modify the document
}

However, this is not straight forward when it comes to create a document from an existing template (.dotx) file. The matter can be worse when a user wants to maintain the connection to the template in the newly created document (which is similar when we create a document from a template manually).

The following steps briefs how to create a document from a template using Open XML SDK and attach it to the document.

  1. Create a copy of the template and open it for editing
  2. Change the document type to WordProcessingDocumentType.Document
  3. Create an AttachedTemplate object
  4. Append the AttachedTemplateobject to the DocumentSettingsPart.Settings.
  5. Add an External Relationship of type AttachedTemplate to the DocumentSettingsPart.Settings.
  6. Save the document.

I will explain each step with the code.

The first step is to create a copy of the template and open it for editing. We can use System.IO.File.Copy() method to create a copy. Once the copy is created, use WordProcessingDocument.Open() method to open the file for editing. Consider we have a template with the name Sample.dotx on the current directory from which we need to create the document.

string sourceFile = Path.Combine(Environment.CurrentDirectory, “Sample.dotx”);
string destinationFile = Path.Combine(Environment.CurrentDirectory, “SampleDocument.docx”);
using(WordProcessingDocument document = WordProcessingDocument.Open(destinationFile, true))
{
// Rest of the code
}

Even though the extension of the destinationFile is “docx”, it is still a template. We need to change the document type using ChangeDocumentType() method

document.ChangeDocumentType(WordProcessingDocumentType.Document);

The next step is to create an AttachedTemplate object and assign a relationship id to it. Assigning the relationship id is important because, the document will identify the attached template using this id.

AttachedTemplate attachedTemplate1 = new AttachedTemplate() { Id = “relationId1”};

Now we can append the AttachedTemplate to the DocumentSettingsPart as given below:

MainDocumentPart mainPart = document.MainDocumentPart;
DocumentSettingsPart documentSettingsPart1 = mainPart.DocumentSettingsPart;
documentSettingsPart1.Settings.Append(attachedTemplate1)

It is not over yet. An essential step is to add an external relationship of type AttachedTemplate and specify the URI of the document template from which the document is created. Do not forget to add the relationship id that we previously specified for AttachedTemplate object.

documentSettingsPart1.AddExternalRelationship("http://schemas.openxmlformats.org/officeDocument/2006/relationships/attachedTemplate", new Uri(sourceFile, UriKind.Absolute), "relationId1");

Now you can add other code to modify the document and then save it. The complete code is given below:

using System;
using System.Collections.Generic;
using System.Linq;
using System.Text;

using DocumentFormat.OpenXml.Wordprocessing;
using DocumentFormat.OpenXml.Packaging;
using System.IO;

namespace GenerateDocumentFromTemplate
{
    class Program
    {
        static void Main(string[] args)
        {
            string destinationFile = Path.Combine(Environment.CurrentDirectory, "SampleDocument.docx");
            string sourceFile = Path.Combine(Environment.CurrentDirectory, "Sample.dotx");
            try
            {
                // Create a copy of the template file and open the copy
                File.Copy(sourceFile, destinationFile, true);
                using (WordprocessingDocument document = WordprocessingDocument.Open(destinationFile, true))
                {
                    // Change the document type to Document
                    document.ChangeDocumentType(DocumentFormat.OpenXml.WordprocessingDocumentType.Document);

                    // Get the MainPart of the document
                    MainDocumentPart mainPart = document.MainDocumentPart;

                    // Get the Document Settings Part
                    DocumentSettingsPart documentSettingPart1 = mainPart.DocumentSettingsPart;

                    // Create a new attachedTemplate and specify a relationship ID
                    AttachedTemplate attachedTemplate1 = new AttachedTemplate() { Id = "relationId1" };

                    // Append the attached template to the DocumentSettingsPart
                    documentSettingPart1.Settings.Append(attachedTemplate1);

                    // Add an ExternalRelationShip of type AttachedTemplate.
                    // Specify the path of template and the relationship ID
                    documentSettingPart1.AddExternalRelationship("
http://schemas.openxmlformats.org/officeDocument/2006/relationships/attachedTemplate", new Uri(sourceFile, UriKind.Absolute), "relationId1");

                    // Save the document
                    mainPart.Document.Save();
                    Console.WriteLine("Document generated at " + destinationFile);
                }
            }
            catch (Exception ex)
            {
                Console.WriteLine(ex.Message);
            }
            finally
            { 
                Console.WriteLine("\nPress Enter to continue…");
                Console.ReadLine();
            }
        }
    }
}

I will add more entries on Open XML. Let me know if you have any queries.

Office shared Add-ins does not load if the assembly name is same

I was working on a case where customer was trying to create two shared add-ins for Microsoft Word. However, only one of those add-ins gets loaded and the other one fails. Later, we found that the reason why this is failing is because the assembly name of both add-ins were same.

When we create a shared add-in for Office, Visual Studio uses “Project1” as the default assembly name for the add-ins. When .NET CLR tries to load the assembly, it fails because an assembly with the same assembly is already loaded. This is because .NET is not able to differentiate between both the assemblies.

There are multiple ways to solve this issue. Some of them are discussed below:

  • Use different names for the assemblies
  • Use different .NET Framework runtime
  • Sign the assembly with strong name key

Changing the assembly name or the .NET framework helps to solve the issue. However, both these options may not be feasible all the times. Hence, the recommended way to resolve this issue is to sign the assembly using a strong name.

Error: “Cannot find an overload for ‘Union’ and the argument count: ‘2’”

When we try to call the Excel Application.Union method through Windows PowerShell, we may get the error “”Cannot find an overload for ‘Union’ and the argument count: ‘2’”. Application.Union method returns the union of 2 or more ranges. It takes 30 arguments where 2 are required and others are optional. To know more about Application.Union method visit the link http://msdn.microsoft.com/en-us/library/bb178176.aspx.

The sample code is given below:

$file="D:\test\test.csv"
$xl=new-object -comObject Excel.Application
$xl.Visible=$true
$wbk = $xl.Workbooks.Open("$file")
$wks = $wbk.worksheets.item(1)
$r1=$wks.Range("A1:D1")
$r2=$wks.Range("A2:D2")
$xl.Union($r1, $r2)

If you test the code on 32 bit Windows PowerShell 2.0 (X86), this will fail with the above mentioned error message. If the PowerShell is 64 bit, the same code will work without any issue.

I am not sure why this error occurs with 32 bit version but does not occur with a 64 bit version of PowerShell. I will update this post once I get an information on this. If anyone knows about this error, please add a comment on it.

How to run a PowerShell Script

I have explained how to write PowerShell script for automating Internet Explorer and Word on my previous posts. In this post, I will try to explain how to run a PowerShell script. One who has run DOS batch files or Unix/Linux shell scripts may think that running PowerShell scripts would be similar to those. Let us see how to run a PowerShell script.

The PowerShell scripts are saved as .ps1 files. There are other formats of PowerShell files like PowerShell Script Modules(.psm1), PowerShell Data Files(.psd1) and PowerShell Configuration Files(.ps1xml). I am not covering the details on these file types in this post.

To run the HelloWorld.ps1 file on the current directory, use the command given below in PowerShell

.\HelloWorld.ps1

First it will seem that this is pretty easy but this is not the case. When you run this command, you may get an error as given below:

File D:\PowerShell\HelloWorld.ps1 cannot be loaded because the execution of scripts is disabled on this system. Please see "get-help about_signing" for more details.
At line:1 char:20
+ .\HelloWorld.ps1 <<<<
+ CategoryInfo : NotSpecified: (:) [], PSSecurityException
+ FullyQualifiedErrorId : RuntimeException

This is because the execution of scripts are disabled on the system. How can we enable this? Before seeing that, we can see what is an execution policy and what are the different types of execution policies available.

Execution Policy

The execution policy of PowerShell determines which scripts to be executed on the machine. There are 4 execution policies available in PowerShell. They are:

Restricted: This is the default execution policy and will not allow any scripts to run on PowerShell. This is only applicable for the scripts. The PowerShell commands can be executed in interactive mode.

RemoteSigned: This will allow to run all the scripts that are created on the machine. The scripts and configuration files that are downloaded from Internet or mail attachment should be signed by the publisher that you trust.

AllSigned: Most Secure. All the scripts should be signed by the publisher that you trust.

Unrestricted: Least Secure. All the scripts are allowed to run on the machine.

Why do we need an execution policy?

Since PowerShell scripts are really powerful, one can write a malicious code that may proove a threat to the system. Execution policy determines whether the scripts to be run or not and which scripts to run.

How to change the Execution Policy

The execution policy can be changed either through Set-ExecutionPolicy cmdlet or directly editing the registry entry. Use the following cmdlet to change the execution policy:

Set-ExecutionPolicy <policy>

Where <policy> can be one of the 4 execution policies that we discussed above (Restricted, AllSigned, RemoteSigned and Unrestricted). Set-Execution Policy sets the value of the registry key “HKEY_LOCAL_MACHINE\SOFTWARE\Microsoft\PowerShell\1\ShellIds\Microsoft.PowerShell\ExecutionPolicy”. You can also manually edit this key to change the execution policy.

For testing purpose, you can either use RemoteSigned or Unrestricted as the execution policy but it is highly advisable to set the execution policy to AllSigned.

Once the execution policy is set to RemoteSigned or Unrestricted, you are good to go writing your own scripts and run it on PowerShell.

Happy Scripting!!!

How to automate Internet Explorer to open a web site using PowerShell?

This is a simple fun script to automate Internet Explorer to open a site. This will also give an idea on how to use automation using PowerShell. Here I will explain how to open www.bing.com in Internet Explorer.

The first step is to get an object of Internet Explorer Application. For that we can use New-Object cmdlet as given below:

$ie = New-Object -ComObject InternetExplorer.Application

Let us see what the code does.
New-Object cmdlet creates a new object and returns it.
-ComObject parameter specifies that the new object is a COM object. When -ComObject parameter is passed, it takes the ProgId of the COM class registered. Otherwise, this is used to create an instance of a .NET Framework Class.
InternetExplorer.Application is the ProgId used for creating a new object.

Once the object is retreived, we can use the methods exposed by the object model of that application for automation.

The next step is to navigate to the URL using Navigate method exposed by Internet Explorer object model. Use the code given below to call Navigate method.

$ie.Navigate("http://www.bing.com")

By creating the object will not display the Internet Explorer. To make it visible, use Visible property of IE object as given below:

$ie.Visible = $true

The values should be preceded by $ sign as in $true
So the full code goes like this:

$ie = New-Object -ComObject InternetExplorer.Application
$ie.Navigate("http://www.bing.com")
$ie.Visible = $true

You can either run this script in PowerShell command window or save this code in a script file (PS1) file and execute it in PowerShell.

Now you know how to automate Internet Explorer in PowerShell.
Happy Scripting !!!

How to automate Microsoft Word using PowerShell?

To begin with, I will not jump into the depths of Office automation or PowerShell but I will explain how to automate Microsoft Word to display “Hello World” using PowerShell script.

The steps involved in automating word are:
1. Create a new Word.Application COM object
2. Add a new document
3. Add a new paragraph object in the document
4. Insert text into the paragraph
5. Display the document

1: Create a new Word.Application COM object
To create a COM object, we can use New-Object cmdlet of PowerShell

$word = New-Object -ComObject Word.Application

2: Add a new document
Use the Application.Documents.Add() method to add a new document

$doc = $word.Documents.Add()

3: Add a new paragraph object in the document
Use Document.Content.Paragraphs.Add() method to add a paragraph to the document

$oPara1 = $doc.Content.Paragraphs.Add()

4: Insert a text into the paragraph
Use Paragraph.Range.Text to add the text

$oPara1.Range.Text = "Heading 1"

5: Display Word application
Set the Visible property of Application object to true

$word.Visible = $true

Finally, the full code will be like this

$word = New-Object -ComObject Word.Application
$doc = $word.Documents.Add()
$oPara1 = $doc.Content.Paragraphs.Add()
$oPara1.Range.Text = "Hello World!"
$word.visible = $true

I will try to explain more features of PowerShell in the upcoming blogs.
Happy Scripting!!

My First Blog

Hi,

I started blogging here today.

Wait and watch for more technical blogs.

Sreerenj